Battlement Mesa Golf Club delivers a traditional mountain layout routed through a natural landscape that is anything but traditional. With dramatic elevation changes that climb from valley floor to high desert, players are presented with striking natural vistas stretching in every direction. From any of the four tee options, the varied challenges are well-presented, letting players choose their approach to each hole. And at just a few feet shy of an official Colorado Mile High elevation, our eyebrow-raising 7,309 yards will play a bit shorter, but make no mistake–there’s plenty of room to hit out here.
A little farther out.
A lot closer to what nature had in mind.
Front Nine
The opening side begins in the more verdant and tree-studded valley. But it’s more than just a flat valley-floor loop, as immediately demonstrated from the striking, elevated first tee. Both accuracy and length will be tested here, as exemplified by The Gauntlet, a jaw-dropping and driver-testing three hole stretch that sets the tone as you turn back toward the clubhouse.
HOLE 1
HOLE 1
PRO TIP
One of the toughest starting holes around. Lay up short of the hill to 165 yards from the green and you’ll have the best look at the green. Big hitters can bomb it over the hill and have a short, uphill approach. Avoid the trap to the left of the fairway that is even with the landing area. There’s trouble left of the green.
 Par 4 Par 4 |
|||||
|
|
||||
HOLE 2
HOLE 2
PRO TIP
Be careful with the tee shot! The carry to cut the corner is farther than it looks. The ideal tee shot is just to the right of the tree on the corner. This will leave you a short to mid-iron approach to this amphitheater green.
 Par 4 Par 4 |
|||||
|
|
||||
HOLE 3
HOLE 3
PRO TIP
Club selection on this par 3 is important. If the ball lands short of the green, it will generally not bounce up, so take plenty of club and fly your ball to the hole. Favor the right side as any misses there have the chance of bouncing down to the green.
 Par 3 Par 3 |
|||||
|
|
||||
HOLE 4
HOLE 4
PRO TIP
A tee shot to the left of the tree in the fairway leaves you with a short iron to a deep, narrow green. Avoid missing this green long or to the right.
 Par 4 Par 4 |
|||||
|
|
||||
HOLE 5
HOLE 5
PRO TIP
You should favor the left side of this fairway as it tilts left-to-right. This can be considered a reachable par 5, but there is some risk involved. The green is hidden around the corner to the left with a creek and trees on the left side. The prudent play is to lay up to 120 yards for your third shot. Be aware of pin position as this green has a large tier in it.
 Par 5 Par 5 |
|||||
|
|
||||
HOLE 6
HOLE 6
PRO TIP
This hole is downhill and generally plays downwind, so don’t be too intimidated by the length. A tee shot just left of the fairway bunker will give you a good look at this expansive, undulating green.
 Par 4 Par 4 |
|||||
|
|
||||
HOLE 7
HOLE 7
PRO TIP
Conservative play is the secret on this three shot par 5. Trying for the green in two is a bad choice as the approach is very narrow with the green being surrounded by bunkers and a small pond to the right. Lay up to about 125 yards for the best access to this green. Par is always a good score.
 Par 5 Par 5 |
|||||
|
|
||||
HOLE 8
HOLE 8
PRO TIP
Playing at the pin on this short par 3 may not be the thing to do. The wind can be a huge factor coming off your right side over the pond, so shoot for the fat of the green. Avoid the bunkers behind the green, as your next shot will generally be back at the water.
 Par 3 Par 3 |
|||||
|
|
||||
HOLE 9
HOLE 9
PRO TIP
A straight tee shot is a must as the sagebrush to the left and right tends to catch a lot of stray balls. The green is large and terraced, so be ware of pin position to get yourself in the right area!
 Par 4 Par 4 |
|||||
|
|
||||
Back Nine
With hardly a tree to be found in bounds, the back nine climbs a plateau overlooking the Colorado River to offer a true high desert experience. The heart of this loop finds the 12th, 13th and 14th following the river, presenting nature at its best, as well as a major incentive to avoid going left. The trip back is capped with the dogleg par 4 where errant drives may find OB and ego drives may find water. It’s the kind of 18th that may decide who’s got the tab at the 19th.
HOLE 10
HOLE 10
PRO TIP
The tee shot on this short par 4 is somewhat blind. Play towards the V in the mountain and that will put you in the middle of the fairway. Don’t hit your drive too far or you’ll have a difficult, uphill approach to this tricky, narrow green. An approach from 100 yards has the best view of the green and will allow you to see where the pin is located.
 Par 4 Par 4 |
|||||
|
|
||||
HOLE 11
HOLE 11
PRO TIP
This dogleg right par 5 can be reached in two if the tee shot is placed just to the left of the fairway bunker. Be aware of the small bunker in front of the green. Once again, check the pin position because the length of this green can mean a four club difference.
 Par 5 Par 5 |
|||||
|
|
||||
HOLE 12
HOLE 12
PRO TIP
The best target off of the tee is the tree in the fairway. Favor the right side of the fairway as balls will roll down to the left. Leave the driver in the bag as the landing area narrows once you reach that tree. Leave yourself about 130 yards to the green for the best view. This green is shallow and tough to putt, so make sure you put yourself in the correct position.
 Par 4 Par 4 |
|||||
|
|
||||
HOLE 13
HOLE 13
PRO TIP
Favor the right side on this slightly downhill par 3. A large green awaits your tee shot, so par should definitely be within reach.
 Par 3 Par 3 |
|||||
|
|
||||
HOLE 14
HOLE 14
PRO TIP
A short hole, but 4 is always a good score. Put the driver away and favor the right side with a hybrid or fairway wood. This downhill approach will make or break you, so check the wind speed and trust your yardage and club selection.
 Par 4 Par 4 |
|||||
|
|
||||
HOLE 15
HOLE 15
PRO TIP
The prevailing winds generally hit you right in the face as you turn back towards the clubhouse. Hit all you have from the tee with the big tree as your target. Your approach shot will be from a downhill lie to a large, tiered green. Par is a good score.
 Par 4 Par 4 |
|||||
|
|
||||
HOLE 16
HOLE 16
PRO TIP
This uphill par 3 is visually intimidating, but rest assured, the green is bigger than it looks. Take enough club to take the front bunker out of play. Don’t flirt with the pin if it’s on the left tier. Play to the center of the green, take your two putts and head to the next tee.
 Par 3 Par 3 |
|||||
|
|
||||
HOLE 17
HOLE 17
PRO TIP
Hit your tee shot just to the right of the Sentinel tree. This narrow green can be reached in two with a good drive, but the prevailing winds will generally prevent that. A smart layup just short of the grass valley will leave a short approach. Make your birdie and hold on for the finale!
 Par 5 Par 5 |
|||||
|
|
||||
HOLE 18
HOLE 18
PRO TIP
The best finishing hole in western Colorado! Avoid the fairway bunker to give yourself the best opportunity to get to this green. The lake does come into play from the tee and on the approach shot. This tiered green is very large, so check the pin position. Take your par and run to the 19th hole!
 Par 4 Par 4 |
|||||
|
|
||||
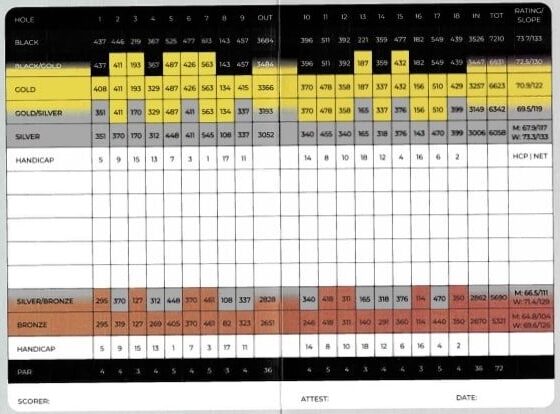
SCORECARD


